Sunday, August 21, 2011
Friday, August 5, 2011
How to Change Pendrive Name With AutoRun
1. Just follow all steps to create an autorun.inf file inside your pendrive at “How to Change The Icon of Your USB Pendrive or Removable Disc“.
2. Now edit your autorun.inf file. Add the line label=*your_custom_name* after [autorun] line. For example, if you want to give custom name “TechGainer”, then the code should be like the following :
[autorun]

label=TechGainer
As I used my pure name “জাবের”(my mother language is Bengali) in my pendrive, my code was looked like :
[autorun] label=জাবের
Screenshot :

For custom name, use label=*custom_name* in autorun.inf file

Choose Unicode ans Encoding before saving autorun.inf file
5. Now save the autorun.inf file in the root of your pendrive.
6. Plug out the pen drive from your computer. Then again plug in to the computer. Now see it’s really working!

Give Bengali or any other name to pen drive

Custom pen drive name with custom icon
Monday, August 1, 2011
How to Lock Files and Folders without any Software
Here is step-by-step guide to achieve that.
1. Download or Copy the following text file which contains the program code:-
Text File -> LockCode.txt
2. Paste the above code in notepad or create a new text document by right clicking on your desktop and selecting New->Text Document.
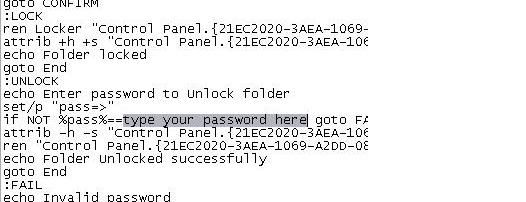
3. Replace “type your password here” with your password in the code you just pasted on the notepad. DON’T FORGET THIS.
 4. Save the above file as BATCH file (by extension .bat). Choose any filename but make sure that it ends with .bat
(Open My Computer. Goto Tools -> Folder Options -> View. Scroll down and UNCHECK Hide extensions for known file types. Now rename your file with .bat extension)
5. Now you can see a MS-DOS BATCH file you just created. See the picture below:-
 6. Double click on it to create a new folder named “Locker“.
7. Now put all files and folders you want to protect in to this new folder “Locker“.
8. Double click that BATCH file again to lock the folder “Locker”. It will disappear as soon as it gets locked.
9. If you want to unlock that folder, double click the BATCH file again. You will be prompted for the password, enter the correct password and that folder “Locker” will then be appear which is easily accessible by you.
1. Download or Copy the following text file which contains the program code:-
Text File -> LockCode.txt
2. Paste the above code in notepad or create a new text document by right clicking on your desktop and selecting New->Text Document.
3. Replace “type your password here” with your password in the code you just pasted on the notepad. DON’T FORGET THIS.

(Open My Computer. Goto Tools -> Folder Options -> View. Scroll down and UNCHECK Hide extensions for known file types. Now rename your file with .bat extension)
5. Now you can see a MS-DOS BATCH file you just created. See the picture below:-

7. Now put all files and folders you want to protect in to this new folder “Locker“.
8. Double click that BATCH file again to lock the folder “Locker”. It will disappear as soon as it gets locked.
9. If you want to unlock that folder, double click the BATCH file again. You will be prompted for the password, enter the correct password and that folder “Locker” will then be appear which is easily accessible by you.
Subscribe to:
Posts (Atom)